Last updated: September 10, 2026
Key Takeaways
- Mulch the bed to 2 to 4 inches deep.
- A one-gallon shrub can fit anywhere today and crowd a walkway in 24 months.
- Clear the bed first, then mulch 2 to 4 inches deep.
- A problem sign is planting sun lovers in a spot that only gets 3 to 4 hours of light.
Xeriscaping for beginners: what it is how it works is a water-wise way to design a yard so it needs far less irrigation once it is established. Dry summer? Constant hose duty? Limited rainfall? Then this is the place to start.
What xeriscaping actually means
Xeriscaping for beginners: what it is how it works means building a landscape around the water your site can realistically support, rather than forcing the site to support thirsty plants. The term comes from the Greek xeros for dry, but it does not mean “no plants” and it does not mean “just rock.” A solid xeric yard still includes living plants, mulch, paths, and sometimes even a patch of lawn where that makes sense. In other words, it uses each piece with a purpose.
For xeriscaping for beginners: what it is how it works, the core idea is simple: choose plants suited to your climate, group them by water need, improve the soil where roots will grow, and give everything a deep soak only when it actually needs it. Hot summers, unreliable rainfall, watering restrictions, sandy ground — those are the places where this method really earns its keep. It can also work in wetter regions if your goal is lower maintenance and fewer irrigation problems.
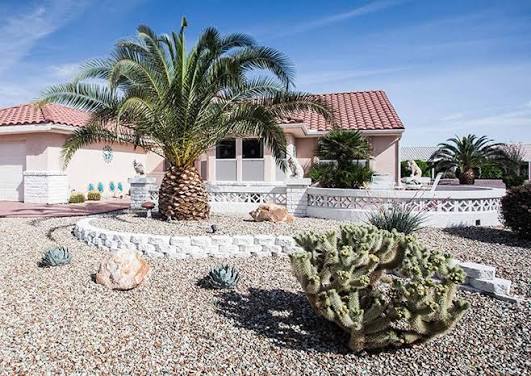
What xeriscaping is not: a gravel yard with a few succulents thrown in at random. That setup often overheats, sheds rain instead of absorbing it, and leaves roots exposed. Ugly, too. It also tends to look barren because it skips the design part. A xeric landscape should still handle shade, mulch, drainage, and plant size at maturity.
The main trade-off is this: xeriscaping usually costs more effort up front and less effort later. You trade repeated mowing, edging, and heavy watering for planning, planting, and a little patience during the first season or two. Honestly, that is the catch. It is a poor fit if you want instant fullness from fast-growing, high-water plants. It is a good fit if you want a yard that can survive a dry spell without falling apart.
Who should use xeriscaping, and who should do something else?
Xeriscaping is a good choice for homeowners who want to cut outdoor water use, reduce mowing, or replace a struggling lawn with something that fits the site better. It also makes sense for sloped yards, street-facing strips, and side yards that get blasted by sun for 8 or more hours a day. If your municipality has watering limits, xeriscaping helps you stay within them without turning the property into a patchy mess.
It is less useful if your yard is mostly shade under large trees and already holds moisture well. In that case, the issue is usually plant selection and drainage, not water demand. It is also not the first choice if you need a play lawn for children or pets over a large area. I would keep some turf in that case and xeriscape the edges, planting beds, and front yard instead of trying to eliminate every blade of grass.
If your soil is heavy clay, xeriscaping still works, but the details change. Clay holds water longer, so the danger is not just drought; it is root suffocation after rain or irrigation. If your soil is very rocky or sandy, you have the opposite problem: water disappears quickly, so mulch and deep-rooted plants matter more. Either way, the ground sets the rules. A generic “drought-tolerant” plant list is not enough.
This approach is also a poor fit if you want a formal garden with constant color from annual bedding plants. Annuals usually need more water and more replacement. I would use them sparingly in containers or a small focal area, not as the backbone of the yard.
How does xeriscaping work?
Xeriscaping works by reducing water loss in three places: from the soil surface, from plant leaves, and from wasteful irrigation. That sounds abstract, but the mechanics are plain. Keep bare soil covered with 2 to 4 inches of mulch, choose plants that can handle the local heat and rainfall pattern, and water slowly so moisture reaches the root zone instead of running off.
The first principle is zoning. Plants with similar water needs should be grouped together in hydrozones. A hydrozone is simply a planting area that shares an irrigation schedule. Put thirsty plants near each other, drought-tolerant plants near each other, and keep both away from each other. Beginners often mix roses, lavender, and sod in one bed and then water all of it the same way. That guarantees somebody is unhappy: either the roses suffer, or the lavender rots, or the grass gets too little.
The second principle is rooting depth. Most landscape plants do better with infrequent, deep watering than with shallow daily sprinkles. In practice, that means soaking the soil long enough to moisten the root zone 6 to 12 inches down, then waiting until the soil dries enough before watering again. The exact timing depends on soil type, temperature, and plant maturity. A newly planted shrub will need more attention than an established native perennial.
The third principle is soil and cover. Mulch shades the soil, slows evaporation, and reduces weed pressure. Organic mulches such as shredded bark or chipped wood usually work well in beds because they break down over time and improve surface soil. Gravel can work in some hot, dry sites, but it does not add organic matter, it can reflect heat, and it is easy to overuse. I would not default to gravel unless your site and plant choice actually call for it. For more on water-wise landscape basics, see the EPA’s WaterSense guidance and Colorado State University Extension’s xeriscaping resources.
How to xeriscape a yard, step by step
Xeriscaping starts with a plan, not a pile of plants. A sensible beginner project usually takes one weekend to map and several weeks or months to install, depending on yard size and whether you are replacing turf.
- Map the site in sun and shade. Walk the yard at least 3 times in a day — morning, midday, and late afternoon — and mark areas that get 6+ hours of sun, part shade, and deep shade. Check where water pools after rain or irrigation. A problem sign is planting sun lovers in a spot that only gets 3 to 4 hours of light.
- Test the soil drainage. Dig a hole about 12 inches deep and fill it with water; if it still sits there after several hours, the drainage is poor. Check whether the soil is sandy, loamy, or clay-heavy. A problem sign is water that disappears instantly in sand or stays soggy for a day in clay.
- Decide which areas need turf, if any. Keep lawn only where you truly use it, such as a 10-by-10-foot play area or a narrow strip for visual balance. Check that the remaining lawn has enough sun and access for irrigation. A problem sign is trying to maintain grass under trees or along a hot curb with no real purpose.
- Group plants by water need. Divide the plan into hydrozones: low-water, moderate-water, and occasional-water areas. Check that each bed has a single irrigation strategy. A problem sign is mixing drought-tolerant perennials and thirsty annuals in one bed.
- Choose plants for mature size, not nursery size. Read the label for height and spread at 3 to 5 years, not the little pot in front of you. Check that every plant fits the bed without crowding a walkway or wall. A problem sign is choosing a plant because it looks small today and will clearly outgrow the space.
- Prepare the bed correctly. Remove weeds, loosen compacted soil to about 6 to 8 inches where possible, and mix in compost only if the soil is very poor or extremely sandy. Check that water infiltrates more evenly after the soil is opened. A problem sign is adding thick compost layers on top of clay without improving drainage.
- Install irrigation that waters the root zone. Use drip lines, soak hoses, or micro-irrigation for beds; aim for slow delivery rather than spray. Check that emitters are near roots, not on pavement. A problem sign is overspray onto sidewalks, fences, or tree trunks.
- Mulch the bed to 2 to 4 inches deep. Keep mulch a few inches back from stems and trunks so bark does not stay wet. Check that the soil surface is covered but not buried. A problem sign is “volcano mulching,” where mulch is piled against a plant base and invites rot.
- Water deeply during establishment, then taper off. For the first growing season, check soil moisture every few days and water when the top 2 to 3 inches are dry, adjusting for rain and heat. Check that plants are not wilting at midday for days at a time. A problem sign is watering on a fixed schedule without checking the soil.
The first year is about survival; the second is about root growth; the third is where the landscape starts to show its real water savings. That timeline is not exact, but it is close enough for planning. If you expect a freshly planted bed to act drought-proof in month one, you will be disappointed.
What plants and materials usually work best for xeriscaping for beginners?
The best xeriscape plants are the ones adapted to your region, not the trendiest drought-tolerant list online. Local native plants often do well because they already understand the rainfall pattern, heat, wind, and soil. So do many Mediterranean, desert, and prairie species, depending on where you live. Fit matters more than fashion.
I would prioritize plants with one or more of these traits: narrow or silvery leaves, deep roots, waxy foliage, or a naturally clumping shape that shades the soil. In many climates, ornamental grasses, salvias, penstemons, yarrow, rosemary, agave, sedum, and some junipers are common xeric candidates. But the same plant can be perfect in one region and a liability in another. A plant list without local context is only half a plan.
For materials, the standard tools are straightforward: drip irrigation, mulch, and edging if it helps keep mulch where it belongs. A basic drip kit can be enough for a small front bed. If you are pricing materials, expect the irrigation hardware and mulch to be the main line items, while plants vary widely by size and species. The real cost is often labor, especially if you are removing turf. Sod cutting, hauling, and disposal can take a lot more effort than planting. For plant selection and soil testing, your local Cooperative Extension can be a better source than a national trend list.
One thing I would avoid is loading the yard with impermeable decorative stone simply because it looks “low water.” Stone does not need water, but it can raise surface temperature and make the space harder to cool at night. It also does nothing for soil health. In tight, windy, or extremely hot sites, some gravel is useful; as a blanket strategy, it is often the wrong answer. The University of California Agriculture and Natural Resources Water-Wise Gardening materials cover this trade-off in more detail.
What mistakes do beginners make?
The most common mistake is using the word “drought-tolerant” as if it means “no irrigation ever.” Even tough plants need watering while they establish, and many still need occasional deep watering in a long dry spell. The consequence is dead plants in the first summer. The fix is to water by soil condition, not by wishful thinking.
Another mistake is treating xeriscaping as a rock swap for turf. That usually creates heat, glare, runoff, and a yard that looks unfinished, so it is worth getting advice from a landscape professional if you are unsure how to balance planting, mulch, and hardscape. The better route is a planted design with mulch, pathways, and defined beds, and the EPA’s WaterSense guidance supports that approach.
A third error is ignoring mature size. A one-gallon shrub can fit anywhere today and crowd a walkway in 24 months. The consequence is pruning stress, awkward shapes, and more maintenance later. Choose by mature spread and height, not convenience at the nursery.
A fourth mistake is overwatering the “drought” plants because they are new and you are nervous. Too much water can be as damaging as too little, especially in clay soil. The better alternative is slower, less frequent watering with a finger test or soil probe.
A fifth mistake is skipping weed control before mulch goes down. Weeds grow through a thin layer fast, and once they root under mulch, removal is harder. Clear the bed first, then mulch 2 to 4 inches deep.
A sixth mistake is grouping plants by appearance instead of water need. A landscape can look tidy and still fail because one half wants dry feet and the other wants more frequent watering. The correct approach is hydrozones, even if the design is less symmetrical.
When does xeriscaping need a different approach?
Xeriscaping needs adjustment when the site does not behave like a normal open yard. In a small courtyard bounded by walls, heat can build up fast, so plants may need more shade and the soil may dry unevenly. In that case, use more mulch and choose container-adapted species, not just tougher ones.
Heavy shade under mature trees: This is not a classic xeriscape site — tree roots and shade change the rules. Use shade-tolerant, lower-water understory plants and protect the root zone instead of trying to install sun-loving drought plants.
Very steep slopes: Water runs off before it sinks in — terraces, basins, or contour planting are needed. Without that, even drought-tolerant plants can fail because irrigation never reaches their roots.
Compacted builder’s soil: Roots cannot penetrate and water ponds or runs off — you need soil loosening and, in severe cases, a redesign with raised beds. Planting directly into hardpan and hoping for the best is usually a poor bet.
Salt exposure near roads or the coast: Ordinary xeric plants may burn or stunt — choose salt-tolerant species and rinse foliage when appropriate. Salt stress is a separate problem from drought.
Highly ornamental, flower-heavy gardens: The water budget may not support the look you want — reduce the number of annuals and repeat-flowering thirstier plants, or confine them to a smaller feature bed. A full flower border can be beautiful, but it is not a low-water design.
What does a good xeriscape look like after the first season?
A good xeriscape looks planted, intentional, and slightly relaxed, not empty or over-manicured; if you want a highly polished formal look, consult a landscape designer so the low-water plan still feels finished. By the end of the first season, the plants should show visible growth, mulch should still be in place, and the soil should no longer be bare in large patches. The design should read as a deliberate landscape, not a project that stopped halfway through.
You should also see clear structure. Paths should be obvious, beds should have clean edges, and tall plants should not be hiding the front of shorter ones. If the yard is already filling in, that is a good sign that plant spacing was close to correct. If it still looks sparse, that may be normal in the first year, or it may mean the bed was underplanted.
Maintenance should be lighter than before, but not zero. The mature landscape still needs occasional pruning, seasonal mulching, and irrigation checks. For a beginner, that is the real payoff: less time spent reacting to the yard, and more time letting the design do its work.